
VOtING dapp
We'll build a client-side application that will talk to our smart contract on the blockchain. This client-side application will have a table of candidates that lists each candidate's id, name, and vote count. It will have a form where we can cast a vote for our desired candidate.
My mentor : Anubhav Chaturvedi
Dlithe
What is a Blockchain?
Normally when you interact with a web application, you use a web browser to connect to a central server over a network. All the code of this web application lives on this central server, and all the data lives in a central database. Anytime you transact with your application, must communicate with this central server on the web.
If we were to build our voting application on the web, we’d run into a few problems:
-
The data on the database could be changed: it could be counted more than once, or removed entirely.
-
The source code on the web server could also be changed at any time.
We don’t want to build our app on the web. We want to build it on the blockchain where anyone connected to the network can participate in the election. We want to ensure that their votes are counted, and that they are only counted once.

How That Works?
Instead of having a network, a central server, and a database, the blockchain is a network and a database all in one. A blockchain is a peer-to-peer network of computers, called nodes, that share all the data and the code in the network. So, if you’re a device connected to the blockchain, you are a node in the network, and you talk to all the other computer nodes in the network. You now have a copy of all the data and the code on the blockchain.
There are no more central servers. Just a bunch of computers that talk to one another on the same network.Instead of a centralized database, all the transaction data that is shared across the nodes in the blockchain is contained in bundles of records called blocks, which are chained together to create the public ledger. This public ledger represents all the data in the blockchain.


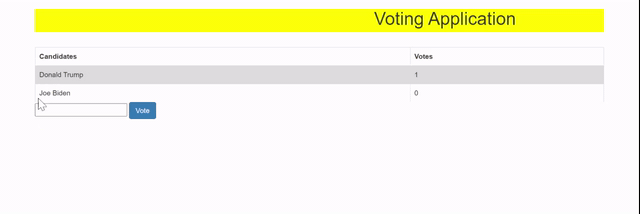
What We'll Be Building
Here is a demonstration of the voting dApp that we'll be building.
.png)
Technical Dependencies
Node Package Manager (NPM)
$ node -v
$ npm install -g truffle
Truffle Framework
Metamask
Ganache
.png)
$ truffle unbox pet-shop
We'll be using the Pet Shop box for this. From within your project directory, install the pet shop box from the command line like mentioned above.Along with the directory structure displayed on the left.
-contracts directory: this is where all smart contacts live. We already have a Migration contract that handles our migrations to the blockchain.
-migrations directory: this is where all of the migration files live. These migrations are similar to other web development frameworks that require migrations to change the state of a database. Whenever we deploy smart contracts to the blockchain, we are updating the blockchain's state, and therefore need a migration.
-node_modules directory: this is the home of all of our Node dependencies.
-src directory: this is where we'll develop our client-side application.
-test directory: this is where we'll write our tests for our smart contracts.
-truffle.js file: this is the main configuration file for our Truffle project
Smoke Test
From the root of your project, go ahead and create a new contract file in the contracts directory called Election.sol.
Let's start by creating a "smoke test" that will ensure that we've set up our project properly, and that we can deploy the contract to the blockchain successfully. Open the file and start with the following code:
pragma solidity 0.4.2;
contract Election {
string public candidate;
function Election () public {
candidate = "Donald Trump";
}
}
Now that we've created the foundation for the smart contract, let's see if we can deploy it to the blockchain. In order to do this, we'll need to create a new file in the migrations directory called 2_deploy_contracts.jsNotice that we number all of our files inside the migrations directory with numbers so that Truffle knows which order to execute them in.
var Election = artifacts.require("./Election.sol"); module.exports = function(deployer) { deployer.deploy(Election); };
First, we require the contract we've created, and assign it to a variable called "Election". Next, we add it to the manifest of deployed contracts to ensure that it gets deployed when we run the migrations.
$ truffle migrate
Now that we have successfully migrated our smart contract to the local Ethereum blockchain, let's open the console to interact with the smart contract.
$ truffle console
Congratulations! You've just written your first smart contract, deployed to the blockchain, and retrieved some of its data.

List Candidates
pragma solidity ^0.4.2;
contract Election {
struct Candidate {
uint id;
string name;
uint voteCount; }
mapping(uint => Candidate) public candidates;
Count uint public candidatesCount;
function Election () public {
addCandidate("Donald Trump");
addCandidate("Joe Biden"); }
function addCandidate (string _name) private {
candidatesCount ++;
candidates[candidatesCount] = Candidate(candidatesCount, _name, 0);
}
}
Now that everything is set up properly, let's continue building out the smart contact by listing out the candidates that will run in the election. We need a way to store multiple candidates, and store multiple attributes about each candidate. We want to keep track of a candidate's id, name, and vote count.
The next thing we need is a place to store the candidates. We need a place to store one of the structure types that we've just created. We can do this with a Solidity mapping. A mapping in Solidity is like an associative array or a hash, that associates key-value pairs.
Now we can add two candidates to our election by calling the "addCandidate" function twice inside the constructor.
At this point, your complete contract code should look like this
Now let's migrate our contract like this:
$ truffle migrate --reset
Now let's write some tests to ensure that our smart contract is initialized correctly.
Testing
Now let's write some tests. Make sure you have Ganache running first. Then, create a new test file called election js.
We'll write all our tests in Javascript inside this file with the Mocha testing framework and the Chai assertion library. These come bundled with the Truffle framework. We'll write all these tests in Javascript to simulate client-side interaction with our smart contract, much like we did in the console. Here is all the code for the tests:
var Election = artifacts.require("./Election.sol");
contract("Election", function(accounts) {
var electionInstance;
it("initializes with two candidates", function() {
return Election.deployed().then(function(instance) {
return instance.candidatesCount();
}).then(function(count) {
assert.equal(count, 2);
});
});
it("it initializes the candidates with the correct values", function() {
return Election.deployed().then(function(instance) {
electionInstance = instance;
return electionInstance.candidates(1);
}).then(function(candidate) {
assert.equal(candidate[0], 1, "contains the correct id");
assert.equal(candidate[1], "Donald Trump", "contains the correct name");
assert.equal(candidate[2], 0, "contains the correct votes count");
return electionInstance.candidates(2);
}).then(function(candidate) {
assert.equal(candidate[0], 2, "contains the correct id");
assert.equal(candidate[1], "Joe Biden", "contains the correct name");
assert.equal(candidate[2], 0, "contains the correct votes count");
});
});
});
Now let's run the tests from the command line like this:
First, we require the require the contract and assign it to a variable, like we did in the migration file. Next, we call the "contract" function, and write all our tests within the callback function. This callback function provides an "accounts" variable that represents all the accounts on our blockchain, provided by Ganache.
The first test checks that the contract was initialized with the correct number of candidates by checking the candidates count is equal to 2.
The next test inspects the values of each candidate in the election, ensuring that each candidate has the correct id, name, and vote count.

$ truffle test
Client-Side Application
Now let's start building out the client-side application that will talk to our smart contract. We'll do this by modifying the HTML and Javascript files that came with the Truffle Pet Shop box that we installed in the previous section. We'll use this existing code to get started. Let's also take note of a few other things that came with the Truffle Pet Shop box like the Bootstrap framework that will keep us from having to write any CSS in this tutorial. We also got lite-server, which will serve our assets for development purposes
You do not have to be a front-end expert to follow along with this part of the tutorial. I have intentionally kept the HTML and Javascript code very simple, and we will not spend much time focusing on it. I want to stay focused on developing the smart contract portion of our dApp!
.png)
Next, replace all of the content of your "app.js" file with this code.Let's take note of a few things that this code does:
-Set up web3: web3.js is a javascript library that allows our client-side application to talk to the blockchain. We configure web3 inside the "initWeb3" function.
-Initialize contracts: We fetch the deployed instance of the smart contract inside this function and assign some values that will allow us to interact with it.
-Render function: The render function lays out all the content on the page with data from the smart contract. For now, we list the candidates we created inside the smart contract. We do this by looping through each candidate in the mapping, and rendering it to the table. We also fetch the current account that is connected to the blockchain inside this function and display it on the page.
.png)
Now let's view the client-side application in the browser. First, make sure that you've migrated your contracts like this:
$ truffle migrate --reset
Next, start your development server from the command line like this:
$ npm run dev
Once you're connected with Metamask, you should see all of the contract and account data loaded.
.png)

Cast Votes
Now let's add the ability to cast votes in the election. Let's define a "voters" mapping to the smart contract to keep track of the accounts that have voted in the election .
The core functionality of this function is to increase the candidate's vote count by reading the Candidate struct out of the "candidates" mapping and increasing the "voteCount" by 1 with the increment operator (++). Let's look at a few other things that it does:
It accepts one argument. This is an unsigned integer with the candidate's id.Its visibility is public because we want an external account to call it.
It adds the account that voted to the voters mapping that we just created. This will allow us to keep track that the voter has
.png)
voted in the election. We access the account that's calling this function with the global variable "msg.sender" provided by Solidity.It implements require statements that will stop execution if the conditions are not met. First require that the voter hasn't voted before. We do this by reading the account address with "msg.sender" from the mapping. If it's there, the account has already voted. Next, it requires that the candidate id is valid. The candidate id must be greater than zero and less than or equal to the total candidate count.
Test Voting Function
Now let's add a test to our "election.js" test file:
it("allows a voter to cast a vote", function() {
return Election.deployed().then(function(instance) {
electionInstance = instance;
candidateId = 1;
return electionInstance.vote(candidateId, { from: accounts[0] });
}).then(function(receipt) {
return electionInstance.voters(accounts[0]);
}).then(function(voted) {
assert(voted, "the voter was marked as voted");
return electionInstance.candidates(candidateId);
}).then(function(candidate) {
var voteCount = candidate[2];
assert.equal(voteCount, 1, "increments the candidate's vote count");
})
});
Next we can write a few test for our function's requirements. Let's write a test to ensure that our vote function throws an exception for double voting:
it("throws an exception for invalid candidates", function() {
return Election.deployed().then(function(instance) {
electionInstance = instance;
return electionInstance.vote(99, { from: accounts[1] })
}).then(assert.fail).catch(function(error) {
assert(error.message.indexOf('revert') >= 0, "error message must contain revert");
return electionInstance.candidates(1);
}).then(function(candidate1) {
var voteCount = candidate1[2];
assert.equal(voteCount, 1, "Donald Trump did not receive any votes");
return electionInstance.candidates(2);
}).then(function(candidate2) {
var voteCount = candidate2[2];
assert.equal(voteCount, 0, "Joe Biden did not receive any votes");
});
});
Now let's write a test to ensure that we prevent double voting:
it("throws an exception for double voting", function() {
return Election.deployed().then(function(instance) {
electionInstance = instance;
candidateId = 2;
electionInstance.vote(candidateId, { from: accounts[1] });
return electionInstance.candidates(candidateId);
}).then(function(candidate) {
var voteCount = candidate[2];
assert.equal(voteCount, 1, "accepts first vote");
// Try to vote again
return electionInstance.vote(candidateId, { from: accounts[1] });
}).then(assert.fail).catch(function(error) {
assert(error.message.indexOf('revert') >= 0, "error message must contain revert");
return electionInstance.candidates(1);
}).then(function(candidate1) {
var voteCount = candidate1[2];
assert.equal(voteCount, 1, "Donald Trump did not receive any votes");
return electionInstance.candidates(2);
}).then(function(candidate2) {
var voteCount = candidate2[2];
assert.equal(voteCount, 1, "Joe Biden did not receive any votes");
});
});
First, we'll set up a test scenario with a fresh account that hasn't voted yet. Then we'll cast a vote on their behalf. Then we'll try to vote again. We'll assert that an error has occurred here. We can inspect the error message, and ensure that no candidates received votes, just like the previous test.
Now let's run our tests:
$ truffle test

Client-Side Voting
Add a form that allows accounts to vote below the table in our "index.html".
Let's examine a few things about this form:
We create the form with an empty select element. We will populate the select options with the candidates provided by our smart contract in our "app.js" file.
The form has an "onSubmit" handler that will call the "castVote" function. We will define this in our "app.js" file.
.png)
Now let's update our app.js file to handle both of those things. First we list all the candidates from the smart contract inside the form's select element.
.png)
First, we query for the candidateId in the form. When we call the vote function from our smart contract, we pass in this id, and we provide the current account with the function's "from" metadata. This will be an asynchronous call. When it is finished, we'll show the loader and hide the page content. Whenever the vote is recorded, we'll do the opposite, showing the content to the user again.

Watch Events
The very last step is to trigger an event whenever a vote is cast. This will allow us to update our client-side application when an account has voted. Fortunately, this is quite easy. Now we can trigger this "voted" event inside our "vote" function like this:
function vote (uint _candidateId) public {
require(!voters[msg.sender]);
require(_candidateId > 0 && _candidateId <= candidatesCount);
voters[msg.sender] = true;
candidates[_candidateId].voteCount ++;
votedEvent(_candidateId);
}
Now that we've updated our contract, we must run our migrations:
$ truffle migrate --reset
Now let's update the client-side application to listen for the voted event and fire a page refresh any time that it is triggered. We can do that with a "listenForEvents" function like this.This test inspects the transaction receipt returned by the "vote" function to ensure that it has logs. These logs contain the event that was triggered. We check that the event is the correct type, and that it has the correct candidate id.
listenForEvents: function() {
App.contracts.Election.deployed().then(function(instance) {
instance.votedEvent({}, {
fromBlock: 0,
toBlock: 'latest'
}).watch(function(error, event) {
console.log("event triggered", event)
App.render();
});
});
}
This function does a few things. First, we subscribe to the voted event by calling the "votedEvent" function. We pass in some metadata that tells us to listen to all events on the blockchain. Then we "watch" this event. Inside here, we log to the console anytime a "votedEvent" is triggered. We also re-render all the content on the page. This will get rid of the loader after the vote has been recorded, and show the updated vote count on the table.
Finally, we can call this function whenever we initialize the contract:
initContract: function() {
$.getJSON("Election.json", function(election) {
// Instantiate a new truffle contract from the artifact
App.contracts.Election = TruffleContract(election);
App.contracts.Election.setProvider(App.web3Provider);
App.listenForEvents();
return App.render();
});
}
Now, you can vote on your client-side application, and watch the votes recorded in real time! Be patient, it might take a few seconds for the event to trigger. If you don't see an event, try restarting Chrome
Congratulations! 🎉 You have successfully built a full stack dApp

Special Thanks to Anubhav Chaurvedi for guiding me all the way through my internship journey and also thanks to Dlithe for giving such a wonderfull opportunity to learn real time technology ....